Easy Butternut Squash Ravioli from tasty.co

Squash filling
2 cups butternut squash, peeled and chopped
½ onion, chopped
3 cloves garlic, peeled
1 tablespoon olive oil
salt & pepper, to taste
1 tablespoon brown sugar
2 oz grated parmesan cheese

Fish pasta
2 cups flour
4 eggs
1 tablespoon olive oil

Hazelnut brown butter sauce
5 tablespoons unsalted butter
¼ cup roasted hazelnut, chopped
10 leaves fresh sage
salt, to taste
1 lemon, juiced
1 oz grated parmesan cheese

  1. Preheat oven to 425˚F.
  2. Add the diced butternut squash, chopped onion, whole garlic cloves, olive oil, salt, and pepper to a baking sheet, tossing until fully coated.
  3. Bake until the squash is golden brown and tender, about 30 minutes.
  4. While the squash is in the oven, make the dough.
  5. When the squash is finished cooking, add it to the food processor along with the brown sugar and Parmesan cheese. Pulse until it becomes smooth. Set aside to chill.
  6. Rinse the bowl of the food processor.
  7. To the bowl of a food processor, add the flour, eggs, and olive oil, and pulse until the dough comes together into a large ball and swirls around the processor.
  8. Removethe dough, wrap in plastic wrap, and rest it the refrigerator for 30 minutes.
  9. Cut 2 ounces of pasta dough from the ball and roll out into large, wide, thin sheets of pasta.
  10. Lay a sheet over an empty ice cube tray, and press the dough down gently into each of the holes.
  11. Fill each hole with a tablespoon of the butternut squash filling. Place a second sheet on top of the ice cube tray. Press down on all the sides of the raviolis. Flip the ice cup tray over to release the pasta and cut off any excess dough.
  12. Separate each ravioli with a knife or cutting tool.
  13. Gently place a few raviolis into boiling salted water and cook until the raviolis float and firm up slightly, 2-3 minutes. Scoop out the ravioli and set aside briefly to cook a new batch or dump out the water and start the hazelnut brown butter sauce.
  14. In a pan, add 3 tablespoons of the butter, sage leaves, and hazelnuts. Cook until the butter browns deeply, the nuts are heated through, and the sage is fried and crispy. Turn off the heat and add the lemon juice and season to taste.
  15. Swirl in 2 more tablespoons more of chilled butter, to thicken the sauce. Add the cooked raviolis back in and toss gently to coat the pasta.
  16. Serve the pasta with brown butter sauce.
  17. Enjoy!

indian moong dal instant pot from twosleevers.com

1 c. yellow mung dal
4 c water
1onion diced
1 tomato diced
2 tbsp garlic/ginger paste
1 tsp turmeric
1/8 tsp cayenne
1 tsp garam masala
1/2 tsp cumin
1/2 tsp corriander
1/2 tsp sugar
lemon juice and parsley or cilantro to finish

place all ingredients in instant pot.
cook for 20 min at high pressure then release naturally
mix in lemon juice and stir well
garnish with cilantro or parsley

Spicy Roasted Broccoli Pasta by Melissa Clark

2 ½ pounds broccoli, cut into bite-size florets
2 tablespoons extra-virgin olive oil, more as needed
1 teaspoon cumin seeds (optional)
¾ teaspoon kosher salt, more as needed
½ teaspoon red pepper flakes, or to taste

  • 12 ounces chiocciole or other tube-shaped pasta
  • ⅓ cup grated Parmesan cheese
  • ⅓ cup panko bread crumbs
  • 1 tablespoon finely grated lemon zest
  • ½ teaspoon freshly ground black pepper
  • 12 ounces best quality, whole milk ricotta
  • Fresh lemon juice, for serving (optional)
  • Heat oven to 425 degrees. On a rimmed baking sheet, toss together broccoli, oil, cumin (if using), 3/4 teaspoon salt and the red pepper flakes. Roast until tender and browned at the edges, 18 to 25 minutes, tossing halfway through. Remove from oven and set oven to broil.
  • Meanwhile, bring a large pot of salted water to boil. Cook pasta according to package directions; drain.
  • In a small bowl, stir together Parmesan, panko, lemon zest, a pinch of salt and the black pepper.
  • Toss cooked pasta with broccoli on baking sheet. Season with salt and pepper to taste, then dollop with ricotta. Sprinkle with Parmesan mix, drizzle generously with oil, and broil until topping is crisped and golden, 2 to 3 minutes. Sprinkle with lemon juice to taste, and serve.

Okonomiyaki from food52.com

Sauce
1/2 cup mayonnaise
2 tablespoons soy sauce
2 teaspoons sriracha, more or less to taste
Pancakes
5 large eggs
1 teaspoon soy sauce
1 teaspoon sesame oil

  • 1 teaspoon sea salt
  • 1/3 cup all-purpose flour
  • 2 cups cabbage, shredded with a mandoline or finely chopped
  • 1 bunch scallions, trimmed and chopped
  • 3/4 cup (roughly) baby or chopped shrimp
  • Canola oil for frying
  • 1-2 tablespoons toasted sesame seeds
  • Bonito flakes (optional)
  1. Whisk the first set of ingredients together and voila, your sauce. Set aside while you make the pancakes.
  2. In a large mixing bowl, whisk eggs with the soy sauce, sesame oil, and salt. Gradually add the flour until incorporated. Fold in cabbage, scallions, and shrimp.
  3. Warm a couple glugs of canola oil in a skillet over medium-high heat until glistening. Ladle the batter into the skillet as you would for regular old pancakes. I usually make them about the size of saucer. Cook on each side for about 3 minutes or until golden brown. Keep pancakes covered in a warm oven as you make the rest. Scatter sesame seeds and/or bonito flakes on top of pancakes and serve with dipping sauce and a cold pilsner.

Somen with Broccoli, Butter and Soy from food52.com

  • 4 tablespoons unsalted butter, divided
  • 2 large cloves garlic, minced
  • 3 tablespoons soy sauce, divided (2/1)
  • 3 to 4 cups small broccoli florets
  • 1/2 cup water
  • 4 ounces Somen noodles (or other very thin wheat noodles)
  1. Start boiling a pot of water for the noodles. They will only take a couple of minutes to cook.
  2. In a large saute pan with a lid, melt 3 tablespoons of the butter. Add the garlic and cook on low heat just until the garlic becomes fragrant. Stir in two tablespoons of soy sauce.
  3. Add the broccoli florets and pour the water over. Stir, cover and cook on medium heat just until the broccoli becomes crisp tender.
  4. Cook the noodles in the boiling pot of water while you’re waiting on the broccoli Like I said, they will cook very quickly. Drain, saving a little of the cooking liquid.
  5. Stir the noodles into the broccoli along with the last tablespoon of butter and the second tablespoon of soy sauce. Add a little of the noodle cooking liquid to loosen everything up and serve right away.  Makes about 3 sides or two mains
  6. I used ramen noodles

Baked honey-marinated cod from nogojisnoglory.com

    • 4, 6-oz black cod fillets (aka sablefish)
    • ¾ cup honey
    • ½ cup low-sodium soy sauce
    • ⅓ cup toasted sesame seed oil
    • ⅓ cup apple cider vinegar
    • 1½ tsp freshly ground pepper
    • 1 tsp freshly chopped ginger
  1. Combine all ingredients (except for fish) in a medium-sized airtight mixing bowl. Add cod and marinate for 24 hours. If possible, flip half way through marinade time to allow even flavor distribution.
  2. Preheat oven to 450 degrees F; prepare a baking sheet with parchment paper. Remove cod from marinade and bake on the center rack for 7-9 minutes, until cod is opaque and flakes easily.

Caramelized Bluefish from myfishingcapecod.com

 Serve this with rice pilaf, a simple salad or my sautéed mushrooms, chickpeas and kale with pesto (link to the recipe in the post)
Ingredients
  • 1 lb bluefish filets
  • 1 bottle of red wine vinegar
  1. In a deep dish, arrange the bluefish in and pour the vinegar over the fish. Let it marinate for 30 minutes (and no longer!).
  2. Set the broiler to high and arrange a baking sheet with tin foil. Arrange the fish filets on the baking pan and broil on the second to top rack for 10 minutes, letting it caramelize. Watch carefully – the fish can easily burn.
  3. After 10 minutes, set the oven to 350 and move the fish to the bottom rack, cooking for another 10 minutes.
  4. The fish should be caramelized at this point and ready to eat. Serve immediately or store fish in an airtight container in the fridge for up to one day.

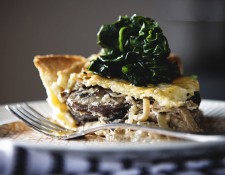
Mushroom pie from meatlessmonday.com

  • 2 ounces assorted dried mushrooms
  • 1 vegetable stock cube
  • 2 teaspoons corn starch
  • 2 tablespoons olive oil
  • 5 baby onions, sliced
  • 3 garlic cloves, diced
  • 12 ounces button mushrooms, sliced
  • 9 ounces Swiss brown mushrooms, sliced
  • 1/2 cup dry white wine
  • 1/4 cup cream

For the crust:

  • 9 ounces margarine
  • 9 ounces flour, sifted
  • 1 teaspoon dried thyme
  • pinch of salt
  • 1/4 cup cold water

To complete the Mushroom Pie:

  • 1 teaspoon black sesame seeds
  • 4 tablespoons nonfat milk
  • 4 ounces spinach, blanched

To make the Mushroom Filling: Place the dried mushrooms in a medium bowl and cover with hot water. Allow to soak for 15-30 minutes, or until the dried mushrooms become tender. Drain the dried mushrooms, reserving the liquid, slice the rehydrated mushrooms and set aside. Combine 1 cup of the reserved mushroom soaking liquid with the vegetable stock cube and cornstarch. Stir until the stock cube and cornstarch have dissolved. Set aside. Heat the olive oil in a frying pan over a medium heat. Add the sliced baby onions and fry for 3-4 minutes, or until onions are beginning to become soft. Add the garlic and cook for a minute more. Add the button mushrooms and continue to cook over a medium heat for 2-4 minutes, or until they start to soften. Add the Swiss mushrooms and cook for 2 minutes further. Place the sliced rehydrated mushrooms into the pan and turn the heat up to high. Pour in the wine and allow to simmer for 1 minute, then add the mushroom liquid stock cube mixture. Turn down the heat to low and let the mushrooms cook over a very gentle heat for 10-15 minutes, or until the Mushroom Filling has reduced a bit. Remove the Mushroom Filing from the stove and stir in the soy creamer. Taste for seasoning and add salt and pepper to taste.

To make the crust: Pre-heat the oven to 350 degrees. In a large bowl, rub the margarine together with the flour until it resembles fine bread crumbs. Add the dried thyme and a pinch of salt. Stir to combine. Add the cold water, one drop at a time, until the mixture forms a dough. You may not need all the water. Roll the dough into a smooth ball, cover with plastic wrap and refrigerate for 10 minutes. Prepare a 35 centimeter pie dish with a light coating of vegetable shortening and set aside. Remove the dough from the fridge and cut into 2 pieces, 1 slightly larger than the other. Prepare a large, flat surface with flour. Roll the larger dough ball out on a floured surface large enough to line the base and sides of your pie dish. Lay the pastry into the prepared dish, prick with a fork a couple of times and return the dish to the fridge for another 10 minutes. Roll out the remainder of the pastry to form the pie lid.

To complete the Mushroom Pie: Pour the mushroom filling into the prepared pie crust. Trim the edges of the pastry from the dish and top with the pie lid. Seal the edges of the pastry case by gently pressing down with a fork or your fingers. Cut a cross in the middle of the pie lid, sprinkle with black sesame seeds and lightly brush with milk. Bake for 20-25 minutes, or until the crust is golden and mushroom filling is bubbling. Remove from the oven and allow the Mushroom Pie to sit a few minutes to cool slightly. Cut in equal pieces and serve topped with blanched spinach.

Madras Lentils/Daal Makhani with brown rice from ministryofcurry.com

  • 1 cup Black Gram Beans/adzuki beans/whole brown lentils
  • 1/3 cup Red Kidney Beans
  • 1 tablespoon oil ghee or coconut oil
  • 1 teaspoon cumin seeds
  • 1 cup finely diced onion
  • 1/4 teaspoon turmeric powder
  • 2 tablespoon fresh ginger grated
  • 2 cups diced tomatoes
  • 2 teaspoon kosher salt
  • 2 teaspoon kashmiri red chili powder
  • 1/2 cup light cream or coconut cream or cashew cream
  • 1 teaspoon garam masala optional for non-spicy lentils
    1/2 tbsp coriander powder
  • 1 tbsp. dried fenugreek
  • 1/2 tbsp  cumin powder
  • cilantro for garnish

Rice:

  • 1 cup brown rice
  • 1 tsp salt

  1. Rinse and soak black gram beans and red kidney beans in 3 cups of water. Overnight or 6-8 hours. Drain the water after soaking and keep the beans aside.
  2. Set Instant Pot to Sauté(more) mode. Once the “Hot” sign displays, add oil and cumin seeds. Add onions and mix well.
  3. Add turmeric powder, fresh ginger, tomatoes, salt, red chili powder, 1/2 tablespoon of cumin powder, 1/2 tablespoon coriander powder, 1 tablespoon of minced garlic along with ginger and red chili powder, 1 tablespoon kasoori methi {dried fenugreek leaves} along with fresh cilantro in the end. 3. You can also add more or less red chili powder and garam masala to adjust the spice level.and beans. Mix well.
  4. Add 2 cups of water.

For pot in pot rice (optional)

  1. Rinse and drain rice. Add rice, 2 cups of water and salt in a stainless steel container.
  2. Put a tall trivet ( I have a 2.75 inch one from amazon) over the beans.
  3. Place rice container on the trivet.
  4. Close Instant Pot with pressure valve to sealing. Cook on Manual(Hi) for 30 minutes followed by Natural Pressure Release.
  5. Open Instant Pot and set to saute mode.
  6. Carefully take out the Rice container and the trivet.
  7. Stir in cream, add garam masala (optional) and garnish with cilantro.

Mushroom Rice from recipetineats.com

2 – 3 tbsp olive oil , separated
2 tbsp butter
1.5 lb mushrooms , sliced 3 – 5 mm / 1/8 – 1/5″ thick (Note 1)
2 garlic cloves , minced
1 small onion , finely diced
1 1/2 cups long grain rice (Note 2)
2 1/4 cups / 565 ml vegetable stock (Note 3)
1 1/2 – 2 cups sliced green onion / scallions
Optional: More butter to stir through

Heat 2 tbsp oil in a large pot over high heat. Add half the mushrooms, and cook for 5 minutes until golden. Season with salt and pepper then remove and set aside.
If the pot is dry, another 1/2 – 1 tbsp oil, and add butter. When melted, add onions and garlic.
Cook for 30 seconds, then add remaining mushrooms. Cook for 5 minutes or until mushrooms are lightly browned (they won’t caramelise as well as the first batch) and the base of the pot is brown.

Add rice and a splash of broth. Mix so the brown stuff on the bottom of the pot mixes into the liquid.
Once the base of the pot is clean, add remaining liquid. Place lid on, bring to a simmer then turn down to medium low.
Cook for 15 minutes or until there is no residual liquid (tilt pot to check).

Remove from stove, remove lid, QUICKLY toss in reserved mushrooms and scallions, put lid back on. Leave for 10 minutes (do not skip this step!).
Fluff rice using a fork or wooden spoon. OPTIONAL: Stir through more butter. 🙂 Serve!
Recipe Notes

1. Use any mushrooms you want, I used normal button mushrooms, it’s even more mushroomy if you use Swiss Brown / Cremini mushrooms. Don’t slice them too thin otherwise they literally disintegrate!

Mushrooms do “suck up” oil but don’t be tempted to add more oil until the end if needed. When raw, mushrooms suck up the oil, but then as they cook, release water and the oil, so this helps them brown towards the end. But if you do find they are looking dry, add just 1 tsp towards the end of browning.

2. Basmati and jasmine would also be great here, comes out nice and fluffy like long grain rice. I find that medium and short grain rice is a bit sticky for my taste when cooked pilaf style. Risotto rice, sushi rice and paella rice are not suitable. Please use uncooked rice.

BROWN RICE: Follow recipe but use 2 1/2 cups liquid for tender, fluffy rice (or 2 3/4 cups for soft rice) and it will take around 45 minutes to cook on the stove (check at 35 minutes, then every 5 minutes until liquid is absorbed).

QUIONA: This will also work with quinoa but adjust the recipe as follows: rinse quinoa, use 3 cups of liquid (I would prob do 2 cups broth, 1 cup water), follow recipe but cook for 20 minutes.

3. The amount of liquid to rice ratio I use yields a tender just cooked rice that is fluffy. If you like your rice on the soft side, use 1/2 cup extra liquid but note that the rice will be stickier rather than fluffy like what you see in the video and photos.

4. SERVES: Makes around 7 cups of rice (packed) which will serve 8 as a side or 4 as a main. YES it’s a lot but it will keep well in the fridge for a few days and it freezes well too!

5. Nutrition per serving, assuming 8 servings.