Mushroom-Lentil Pate, The Washington Post, December 26, 2012

Food0061355369231
The herb-infused lentils are such a nice element of this pate that you might consider making extra and using the leftovers, including their liquid, to sauce pasta or rice.

Serve the pate with whole-grain crackers or rye toasts, garnished with thyme, if desired.

MAKE AHEAD: The pate can be made, covered and refrigerated 2 days in advance.

Makes 1 1/4 cups (5 servings)

1/3 cup (about 3 ounces) dried brown lentils
2 sprigs thyme, plus more for optional garnish
1 teaspoon medium-grain sea salt
3 tablespoons extra-virgin olive oil
1 medium yellow onion, diced (about 1 cup)
1 clove garlic, smashed with the flat side of a knife, then minced
8 ounces cremini mushrooms, chopped
1 tablespoon medium-dry sherry
1/2 cup (about 3 ounces) pecan halves or pieces, toasted (see NOTE)
1/4 teaspoon freshly ground black pepper
1 1/2 teaspoons balsamic vinegar

Cover the lentils with an inch of water in a small, heavy saucepan over medium-high heat. Bring almost to a boil, then reduce the heat to low and cook until tender, about 20 minutes, adjusting the heat so the water is barely bubbling. Remove from the heat, stir in the thyme sprigs and 1/4 teaspoon of the salt, then cover and let sit for at least 30 minutes.

Heat a large, heavy skillet over medium heat until warm. Add 1 1/2 tablespoons of the oil, the onion and 1/4 teaspoon of the salt, and cook until translucent, 7 or 8 minutes. Add the garlic and cook a few minutes longer. Add the mushrooms and 1/4 teaspoon of the salt, toss to coat with the oil, cover partly and cook until the mushrooms have released their liquid, about 10 minutes. Uncover and cook until most of the remaining liquid evaporates. Add the sherry, and cook until it just glosses the bottom of the pan, about 1 minute. Cover the skillet and remove it from the heat.

Pulse the pecans in the bowl of a food processor until they are finely ground. Add the onion-mushroom mixture and process until just combined. Drain the lentils, reserving the cooking liquid for another use, if desired, and add them to the food processor along with the remaining 1 1/2 tablespoons of oil, the remaining 1/4 teaspoon of salt and the pepper. Process until smooth, 2 to 3 minutes. Add the vinegar and pulse just until combined. It should be about the consistency of peanut butter.

The pate can be served in a bowl immediately, garnished with additional thyme, if desired. It can also be molded. Transfer the pate into a small loaf pan or bowl lined with plastic wrap and refrigerate for at least an hour. When ready to serve, unmold the pate onto a serving plate and remove the plastic wrap.Garnish with additional thyme, if desired.

NOTE: To toast the pecans, spread them on a baking sheet and place in a 350-degree oven, shaking the sheet occasionally, for 8 to 10 minutes. Watch carefully; nuts burn quickly.
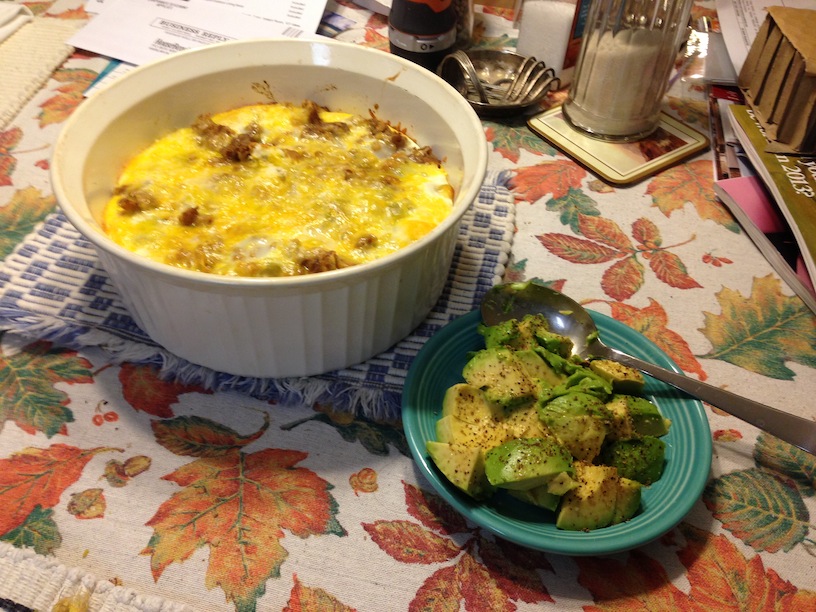
Green Chile Strata — food and wine cookbook

IMG_0400
6 flour tortillas
4 -4ounce cans chopped green chilies — drained
4 cups Monterey Jack cheese — grated
2 cups milk (can use one cup half & half — 1 cup regular)
5 eggs
1 teaspoon salt and white pepper
1 pound hot sausage — crumbled and cooked, I used veggie chorizo

Grease a 13×9 inch baking dish with butter. Cover bottom of pan
with half of the tortillas, cutting them to fit without overlapping.
Sprinkle with half the sausage (if using), half the chilies, then half the cheese.
Repeat layers, ending with cheese.

Combine eggs, milk, salt and pepper in a medium sized bowl. Pour
over the layers. Let stand, covered in refrigerator for at least one hour, overnight is fine.

Preheat oven to 350 degrees. Bake for 45 minutes, or until strata
is puffed and bubbly. Cook 10-15 minutes until set, then cut into squares.

I combine just before bedtime the night before, then refrigerate
overnight. We serve with warm salsa, guacamole, fresh pineapple chunks and more tortillas.

Recipe Notes
Here is a breakfast strata that uses flour tortillas. This
is a great lazy Saturday or Sunday brunch. The flour tortillas absorb
the liquid, then when baked, puff up giving it a souffle-like appearance. It is really great made with freshly roasted & peeled Hatch chilies.
Mary M.

the great unshrinkable sweet tart shell

Adapted from Dorie Greenspan

My favorite part about this shell recipe and technique is that it doesn’t require pie weights. How cool is that?!

Makes enough for one 9-inch tart crust

1 1/2 cups all-purpose flour
1/2 cup confectioner’s sugar
1/4 teaspoon salt
1 stick plus 1 tablespoon (9 tablespoons; 4 1/2 ounces) very cold (or frozen) unsalted butter, cut into small pieces
1 large egg*

1. Pulse the flour, sugar and salt together in the bowl of a food processor. Scatter the pieces of butter over the dry ingredients and pulse until the butter is coarsely cut in. (You’re looking for some pieces the size of oatmeal flakes and some the size of peas.) Stir the yolk, just to break it up, and add it a little at a time, pulsing after each addition. When the egg is in, process in long pulses–about 10 seconds each–until the dough, which will look granular soon after the egg is added, forms clumps and curds. Just before you reach this stage, the sound of the machine working the dough will change–heads up. Turn the dough out onto a work surface and, very lightly and sparingly, knead the dough just to incorporate any dry ingredients that might have escaped mixing. Chill the dough, wrapped in plastic, for about 2 hours before rolling.

2. To roll the dough: Butter a 9-inch fluted tart pan with a removable bottom. Roll out chilled dough on floured sheet of parchment paper to 12-inch round, lifting and turning dough occasionally to free from paper. (Alternately, you can roll this out between two pieces of plastic, though flour the dough a bit anyway.) Using paper as aid, turn dough into 9-inch-diameter tart pan with removable bottom; peel off paper. Seal any cracks in dough. Trim overhang to 1/2 inch. Fold overhang in, making double-thick sides. Pierce crust all over with fork.

Alternately, you can press the dough in as soon as it is processed: Press it evenly across the bottom and up the sides of the tart shell. You want to press hard enough that the pieces cling to one another, but not so hard that it loses its crumbly texture.

3. Freeze the crust for at least 30 minutes, preferably longer, before baking.

4. To fully or partially bake the crust: Center a rack in the oven and preheat the oven to 375 degrees F. Butter the shiny side of a piece of aluminum foil (or use nonstick foil) and fit the foil, buttered side down, tightly against the crust. And here is the very best part: Since you froze the crust, you can bake it without weights. Put the tart pan on a baking sheet and bake the crust for 20 to 25 minutes.

5. Carefully remove the foil. If the crust has puffed, press it down gently with the back of a spoon. Bake the crust about 10 minutes longer to fully bake it, or until it is firm and golden brown, brown being the important word: a pale crust doesn’t have a lot of flavor. (To partially bake it, only an additional 5 minutes is needed.) Transfer the pan to a rack and cool the crust to room temperature, and proceed with the rest of your recipe.

Do ahead: The dough can be wrapped and kept in the refrigerator for up to 5 days or frozen for up to 2 months. While the fully baked crust can be packed airtight and frozen for up to 2 months, the flavor will be fresher bake it directly from the freezer, already rolled out.

* Updated 2/4/09: In response to concerns (including mine!) about this crust crumbling easily when rolled out, I found that using the whole egg instead of just the egg yolk holds it together better, making it easy to roll out in one piece.

from the smitten kitchen blog

whole lemon tart

1 partially baked 9-inch Great Unshrinkable Tart Shell, or your favorite sweet tart shell

1 average-sized lemon (about 4 1/2 ounces; 130 grams), rinsed and dried*
1 1/2 cups (300 grams) sugar
1 stick (4 ounces or 115 grams) unsalted butter, cut into chunks
4 large eggs
2 tablespoons (14 grams) cornstarch
1/4 teaspoon table salt

Center a rack in the oven and preheat the oven 350°F (165´C). Place the tart shell on a baking sheet, which you can line with foil or parchment paper to make any spills a breeze to clean up.

Slice the lemon into thin wheels, remove any seeds, and toss the rounds — lemon flesh and peel — sugar and chunks of butter into the container of a food processor. Process, scraping down the sides of the container as needed, until the lemon is thoroughly pureed. Add the eggs, cornstarch and salt and pulse until the batter is smooth.

Pour into prepared tart shell. It will fill it completely but if due to slight variances in tart pans, egg sizes, lemon sizes or crust thickness, you have too much, do not pour it past the top of of your crust or it will become difficult to unmold later.

Bake for 35 to 40 minutes or until the filling is set. You can test this by bumping the pan a little; it should only jiggle slightly. In my oven, I find that the point at which the filling is set is also when it starts to get very light brown on top.

Let cool on rack, unmold tart pan and serve. I actually prefer this tart completely chilled, which makes it a great dessert to make in advance of a dinner or party.

* Meyer lemons are the first choice here. They’re milder with thinner skin. But if you know that you do not mind a stronger lemon and rind kick, feel free to use a regular lemon, which will have a stronger flavor and a higher proportion of skin to flesh. If your lemon is not 4 1/2 ounces (Meyers often weigh in closer to 4 ounces) go ahead and cut a wedge out of a second one to keep the lemon flavor in balance with the sweetness of the tart.

from the smitten kitchen blog

Bruce Ezzell’s Bagels

bagels
Sponge (4 to 12 hours before baking; do this before you go to bed if you want fresh bagels for breakfast or brunch, only takes a minute)

500 grams flour/18 ounces/ 3.5 cups
500 grams water/18 ounces/ 2 1/4 cups
3 grams active dry yeast/3/4 teaspoon
Combine the ingredients in the bowl of a standing mixer and mix with a spoon till the ingredients are combined. Set aside at room temperature for at least 4 hours. Do this before going to bed if you want fresh bagels in the morning.

18 grams kosher salt/.6 ounces/1 tablespoon
18 grams honey/1 scant tablespoon
18 grams malt syrup/1 tablespoon (you can substitute molasses if you wish)
446 grams flour/16 ounces/ 3 cups
Baking Soda (1/2 tablespoon for every 2 liters/1/2 gallon water)
Poppy seeds, sesame seeds, coarse salt or other garnish (optional but recommended

Add salt, honey, malt syrup, and flour to the sponge, the flour last. Attach dough hooks to your mixer and mix at low speed for 8-10 minutes. This is a stiff, bucky dough so don’t walk away from the mixer if it has a tendency to walk across your counter top. I’ve had more than one mixer hit the floor and it is distressing. (This can also be mixed by hand.)

Once the dough is mixed remove it to your counter and cover with a cloth to let it rest for 5-10 minutes. While the dough is resting place a wide, fairly deep pot filled with water on the stove to heat (measure the water so you know how much baking soda to use). When I boil I typically use a pan like a wok filled with water. Once the water comes to a simmer add the baking soda. Pre-heat your oven to 450 degrees.
Divide the dough into 12-13 (4 oz) pieces. Round each piece and set aside to rest for a few more minutes, covered.

To shape take each ball of dough and flatten out slightly using the palm of the hand, making a disc approximately 3.5 inches wide. Make a hole in each using your thumb and place back on the counter, covered, to rise.

After 10 minutes flip each bagel over so the bottom is now facing up. When this side begins to get slightly puffy and rounded it is time to boil. This may take as little as 5 minutes, but depending on the temperature of your kitchen, how cold your countertop is, etc., it might take longer. When the bagel looks and feels a bit puffy, it’s ready to boil.

While your bagels are in their final rise bring your water to a simmer, then add the baking soda.

Drop the bagels 3-4 at a time into the simmering water (depending on how large your pot is). They should float immediately or within a few seconds. Let them simmer for one minute, then flip them over using a chopstick or spoon and let the other side simmer for one minute. Remove from the water using a skimmer or large spoon. I like to bake them on a half-sheet pan lined with parchment paper. They can also be baked on a pizza stone.

Sprinkle them with sesame, poppy seeds, salt or whatever you prefer immediately after removing them from the water, or alternately, brush with an egg wash and sprinkle after that.
Bake at 450 degrees F for 12-13 minutes or until golden brown.
On occasions that I have run out of malt I have substituted molasses and received excellent reviews. Some might consider it blasphemy, but really, who cares? My customers are much more pleased with overall flavor when I boil in an alkaline (water with baking soda) solution than when I boil in a sugar water solution.

Ruhlman.com

Old Vermont Cocktail – Bobby Flay

vt cocktail

1 1/2 ounces gin
1/2 ounce grade B pure maple syrup
1/4 ounce freshly squeezed lemon juice
1/4 ounce freshly squeezed orange juice
2 dashes bitters, such as Angostura
Ice
Orange rind

Combine the gin, maple syrup, lemon and orange juice and bitters in a cocktail shaker. Add some ice and shake a few times. Strain the drink into a martini glass and garnish with the orange rind.

Roasted butternut squash and carrot soup

1 butternut squash cut in half
3 carrots cut in pieces
2 cloves garlic cut in half
1 onion diced
1 – 2 tbsp olive oil
1 tsp cumin
1/2 tsp corriander
medium piece of orange zest, no white
salt and pepper
4-6 C water
1 tsp soup base

Place squash with seeds left in it’s easier to remove them after roasting, carrots and garlic on lightly greased baking sheet, roast in 350 degree oven until squash is done, 30-50 minutes. In the meantime put olive oil in dutch oven add onion and cook until translucent add spices and cook for a few minutes. Remove squash add to the onion along with carrots and garlic. Add water, soup base, salt and pepper along with orange zest. Bring to a slow boil, then turn down to a simmer and allow to cook 20 min. Remove orange zest then whirl with emersion, adjust seasoning and serve. Would be nice with a dollop of creme fraiche or sour cream and some toasted pumpkin seeds

Seitan Scaloppine with Lemon-Olive Sauce

I used Imagine Foods’ No-Chicken Broth to mimic the taste of chicken, but any vegetable broth may be used.

1 cup vital wheat gluten
2 tablespoons nutritional yeast
1 teaspoon onion powder
1/2 teaspoon salt
1/4 teaspoon basil
3/4 cup Imagine No-Chicken Broth (or other vegetable broth)
2 tablespoons tahini or cashew butter

1 tablespoon unbleached flour
1 lemon, sliced
3 cloves garlic, crushed slightly
10 green olives, pitted and sliced
1 1/4 cups No-Chicken Broth
2-3 tablespoons white wine or vermouth
2 tablespoons lemon juice
1 tablespoon minced flat-leaf parsley
salt and pepper
additional vegetable broth, as necessary

Tear off 4 pieces of aluminum foil about 10 inches long. (See tips below for a foil-free way of making the scaloppine). Begin heating water in a steamer.

In a large bowl, mix the vital wheat gluten with the nutritional yeast, onion powder, salt, and basil. In a smaller bowl, whisk together the broth and tahini (or cashew butter). Stir the wet mixture into the dry until well blended. Knead gently 10 times. Quickly divide dough into 4 equal pieces.

Take a piece of dough and shape and flatten it into a thin oval cutlet. Place it on a sheet of foil, a little higher than center. Fold the bottom of the foil over to meet the top, and then fold the two edges over about 1/2 inch to form a seam. Continue folding the foil by half inches until it reaches just above the cutlet. Flatten the cutlet down a little more, and then fold the left and right edges in the same way until the packet is snug around the cutlet. Repeat with all pieces of dough.

Place the packets flat into the steamer and cover. Steam for 25 minutes. Keep packets sealed until you’re ready to use them.

Spray a non-stick skillet (or some other non-iron skillet) with olive oil. Begin heating it as you prepare a plate containing the flour sprinkled with a little salt and pepper. Once the skillet is hot, unwrap each cutlet and lightly dredge each side in the flour and then place in the skillet. Cook until brown and then turn over and brown other side. Remove to a plate.

(If you’d rather not use any oil at all, skip the flouring of the cutlets and just brown them alone. Your sauce may not thicken unless you add a little flour to it later.)

Add the garlic and lemon slices to the pan. Cook until the lemon slices have softened, 2-3 minutes, and then remove them from the pan, leaving the garlic. Add the olives, broth, wine, and lemon juice and cook on medium heat until the liquid starts to reduce. Remove the garlic, add salt and pepper to taste, and return the cutlets to the pan. Turn them over to coat with the sauce. Simmer briefly to warm them through, and if the sauce becomes too thick, add a little broth to thin. Stir in the parsley, and remove the cutlets to plates. Spoon some sauce over each cutlet and garnish with lemon slices.

Tips for Moister Cutlets:

I found two different tricks that resulted in a cutlet that was a little moister. Unfortunately, one of them requires an extra step, simmering the seitan in broth for a few minutes after it comes out of the steamer. If you’d like to do this, just put the cutlets in a skillet, add broth to about halfway over them, and simmer, turning, for 3-5 minutes. The cutlets will absorb a lot of the broth, so be ready to add more as necessary. Once they’re done, remove them from the broth and proceed with the recipe.

No extra step is required for the other technique; in fact, it’s simpler than the original recipe, though you will need a large steamer and plates that will fit inside it. Instead of wrapping the cutlets in foil, place them on the largest plate that will fit in your steamer. (If you have a double-level steamer, you can place two cutlets on smaller plates on each level.) Cover with an inverted plate of the same size, to keep water from dripping directly onto your cutlets. Steam for 25 minutes. Your cutlets will be a little lighter in color but will have a moister texture. This is my preferred way of making these cutlets!

Makes 4 servings.

Cheese ball — Blake

1 cup sharp Cheddar; finely chopped
1 cup Havarti; finely chopped
1/2 cup softened Brie
1 tsp black pepper
1 tbsp red pepper flakes
chili powder
chopped pecans

Mix the cheeses and peppers together very thoroughly and let it warm sufficiently to form it. Do that and then chill it a while. Roll it in the chili powder and then the pecans.

Oyster stew — allrecipes.com

1/2 cup butter
1 cup minced celery
3 tablespoons minced shallots
1 quart half-and-half cream
2 (12 ounce) containers fresh shucked oysters, undrained
salt and ground black pepper to taste
Pinch of cayenne
dash of worstershire sauce
parsley, minced

Melt the butter in a large skillet over medium heat, and cook the celery and shallots until shallots are tender.

Pour half-and-half into a large pot over medium-high heat. Mix in the butter, celery, and shallot mixture. Stir continuously. When the mixture is almost boiling, pour the oysters and their liquid into the pot. Season with salt, pepper, and cayenne pepper. Stir continuously until the oysters curl at the ends. When the oysters curl the stew is finished cooking; turn off the heat and serve.