Chocolate Tart with Chocolate Chip Cookie Crust, Martha Stewart

tart-0205-0711md107295_hd

FOR THE CRUST
16 chocolate chip cookies (3 inches; baked until crisp), finely ground (2 cups)
2 tablespoons unsalted butter melted

FOR THE FILLING
1 cup heavy cream
8 ounces semisweet chocolate chopped (1 1/3 cups)
1 large egg
1/4 cup whole milk
1 tablespoon unsalted butter
Creme fraiche, for serving

Preheat oven to 350 degrees. Make the crust: Stir together cookie crumbs and melted butter. Press into bottom and up sides of a 9 1/2-inch fluted tart pan with a removable bottom. Refrigerate until chilled, about 30 minutes.

Bake until firm and darkened, 10 to 12 minutes. Let cool completely on a baking sheet. Meanwhile, make the filling: Heat cream in a saucepan until just starting to boil. Pour over chocolate in a bowl. Let stand for 1 minute, then stir. Whisk in egg, and butter. Pour into cooled crust.

Reduce oven temperature to 300 degrees. Bake tart until edges of filling are set but center still jiggles slightly, 20 to 24 minutes. Transfer to a rack. Serve warm or at room temperature. Top with creme fraiche.

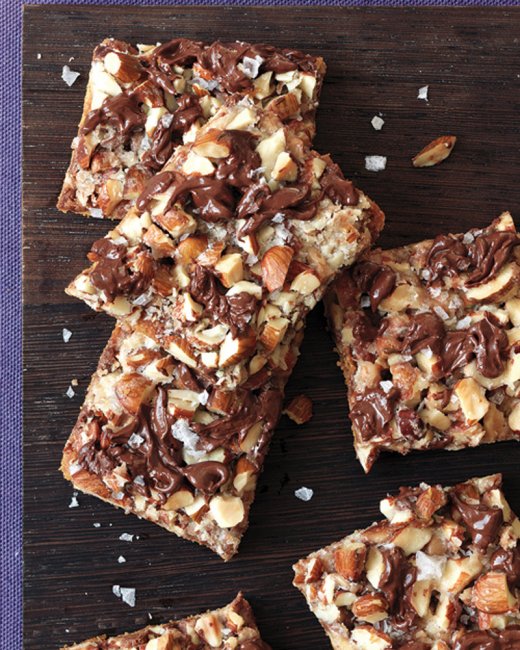
Salted Toffee-Chocolate Squares martha stewart

med105506_0510_salted_toffee_vert (1)
13 graham crackers
1 bag (8 ounces) toffee bits
1 1/2 cups coarsely chopped toasted natural almonds
1/2 cup sugar
1 cup (2 sticks) unsalted butter
3/4 cup (4 ounces) bittersweet chocolte,chopped, or chocolate chips
3/4 teaspoon coarse salt

Preheat oven to 350. Line a rimmed baking sheet with foil. Place graham crackers in a single layer on sheet, edges touching. Sprinkle toffee bits and almonds over graham crackers.

In a small saucepan, bring sugar and butter to a boil over medium-high heat and cook at a rapid boil, simmer, swirling pan occasionally, until mixture is syrupy, 2 minutes. Immediately pour over graham crackers Bake until sugar topping is bubbling, 12 minutes. Remove from oven and immediately sprinkle chocolate and salt over graham crackers. With a sharp knife or pizza cutter, cut into 2-inch squares. Let cool completely on sheet on a wire rack. (Store in an airtight container, up to 1 week.)

Dutch Apple Cake from Elizabeth Peters

My husband and I came to Canada over 40 years ago from Holland. This traditional Dutch recipe is a family favorite and frequently goes along with me to potluck suppers and other get-togethers. —Elizabeth Peters,
Dutch Apple Cake One
– 3 medium tart apples, peeled and cut into 1/4-inch slices (3 cups)
– 3 tablespoons plus 1 cup sugar, divided
– 1 teaspoon ground cinnamon
– 2/3 cup butter, softened
– 4 Eggs
– 1 teaspoon vanilla extract
– 2 cups all-purpose flour
– 1/8 teaspoon salt

In a large bowl, combine the apples, 3 tablespoons sugar and cinnamon; let stand for 1 hour. In another bowl, cream butter and remaining sugar until light and fluffy. Add eggs, one at a time, beating well after each addition. Add vanilla. Combine flour and salt; gradually add to creamed mixture and beat until smooth. Transfer to a greased 9-in. x 5-in. loaf pan. Push apple slices vertically into batter, placing them close together. Bake at 300° for 1-1/2 to 1-3/4 hours or until a toothpick inserted near the center comes out clean. Cool for 10 minutes before removing from pan to a wire rack. Serve warm. Yield: 10-12 servings.

Apple pie cake from Martha Stewart

apple cake

2 cups flour
1 cup packed light-brown sugar
2 teaspoons cinnamon
1/2 pound (2 sticks) cold unsalted butter, cut into 8 pieces
5 pounds (about 12) tart apples, such as Granny Smith
2 tablespoons fresh lemon juice

In a large bowl, combine flour,and 1 teaspoon cinnamon. Using an electric mixer or a pastry cutter, cut in until the mixture forms pea-size pieces. Press 2/3 of the mixture onto bottom and 1 inch up the side of a 9-inch springform pan.

Preheat oven to 350 degrees. apples cut into thin slices, and place in a bowl. Pour off any accumulated liquid. Toss apple slices with remaining teaspoon cinnamon and lemon ,and put them in the prepared pan, pressing down gently as you pack them in (they will mound above the edge of the pan). Sprinkle remaining crumb mixture on top.

Put the pan on an aluminum foil-lined baking sheet, and for 1 hour and 15 minutes, or until golden brown on top. Run a knife around the edge of the pan, and let the cake cool in the pan to set. Serve at room temperature.

Salted Caramel Pie from food & wine

1 1/4 cups gra201111-r-salted-caramel-pieham cracker crumbs (about 5 ounces)
4 tablespoons unsalted butter, melted
1/4 cup light brown sugar
Two 14-ounce cans sweetened condensed milk
Fleur de sel
2 cups heavy cream
2 tablespoons confectioners’ sugar

  1. Preheat the oven to 350°. In a food processor, pulse the graham cracker crumbs with the melted butter and light brown sugar until the crumbs are moistened. Press the crumbs evenly into a 9-inch glass or metal pie plate. Bake for about 10 minutes, just until lightly browned. Let cool. Increase the oven temperature to 425°.
  2. Scrape the condensed milk into a 9-by-13-inch glass baking dish and sprinkle with a scant 1/2 teaspoon of fleur de sel. Cover the dish with foil and place it in a roasting pan. Add enough hot water to the pan to reach one-third of the way up the side of the baking dish. Bake, lifting the foil to stir 2 or 3 times, until the condensed milk is golden and thickened, about 2 hours; add more water to the roasting pan as necessary. The consistency of the caramel should be like dulce de leche. Don’t worry if it is lumpy; it will smooth out as it chills.
  3. Scrape the caramel filling into the pie crust, smoothing the top. Spray a sheet of plastic wrap with vegetable oil spray and cover the pie. Refrigerate until the filling is chilled and set, at least 4 hours.
  4. In a bowl, using an electric mixer, beat the cream with the confectioners’ sugar until firm. Remove the plastic. Mound the whipped cream on top of the pie and sprinkle with fleur de sel. Cut into wedges and serve.
MAKE AHEAD The recipe can be prepared through Step 2 up to 5 days ahead. Refrigerate the crust and filling separately.


Caramel Sauce by Rose Levy Beranbaum The Pie and Pastry Bible

This sauce is for the caramel lover. It’s equally wonderful over ice cream, cake, or apple pie. It is just thick enough when hot, but not clumpy or sticky as it cools on the plate. Don’t be afraid of making caramel. If you follow the simple but important Pointers for Success below, it will be easy. Do be sure when making it not to have any small children about and give it your undivided attention. Caramel burns are extremely painful.
download (1)
1 cup sugar (7 ounces = 200 grams)
1 tablespoon Lyle’s Golden Syrup (refiner’s syrup) or corn syrup (0.75 ounce = 21 grams)
1/4 liquid cup water (2 ounces = 60 grams)
1/2 liquid cup heavy cream, heated (4 ounces = 116 grams)
2 tablespoons unsalted butter, softened (1 ounce = 28 grams)
1 teaspoon pure vanilla extract

EQUIPMENT
A heavy saucepan, at least 5-cup capacity, ideally with a nonstick lining

In the saucepan, stir together the sugar, syrup, and water until the sugar is completely moistened. Heat, stirring constantly, until the sugar dissolves and the syrup is bubbling. Stop stirring completely and allow it to boil undisturbed until it turns a deep amber (380°F.). Immediately remove it from the heat and slowly and carefully pour the hot cream into the caramel. It will bubble up furiously.

Use a high-temperature heat-resistant rubber spatula, or a porcelain or wooden spoon to stir the mixture until smooth, scraping up the thicker part that settles on the bottom. If any lumps develop, return the pan to the heat and stir until they dissolve. Stir in the butter. The mixture will be streaky but become uniform after cooling slightly and stirring.

Allow the sauce to cool for 3 minutes. Gently stir in the vanilla extract.

For a decorative lacing effect, this caramel pours perfectly at room temperature. For the greatest precision, use a pastry bag with a small decorating tube or a reclosable bag with a small piece cut from one corner.

STORE
Room temperature, up to 3 days; refrigerated, at least 3 months. To reheat: If the caramel is in a microwave-safe container at room temperature, microwave it on high power for 1 minute, stirring twice. If cold, it will take a few seconds more. Alternatively, place it in a bowl in a pan of simmering water and heat, stirring occasionally, until warm, about 7 minutes.

Understanding
Refiner’s or corn syrup helps to prevent the caramel sauce from crystallizing when stirred. It also lowers the caramelization temperature.

I adore the flavor of caramel, so I like to have as much depth of flavor as possible without any burnt flavor. I bring this caramel up to at least 380°F. for maximum flavor. The darker you make the caramel, the less sweet it will seem, but you risk burning it if you don’t have an absolutely accurate thermometer.

It’s best to have the cream hot and the butter at room temperature to avoid splattering when they are added to the hot caramel. Cold cream, however, speeds the cooling and is practical if you’re pressured for time — but it must be added very slowly.

I do not recommend using crème fraîche in place of heavy cream, as it does not decrease sweetness to any significant degree nor does it add interest of flavor.

Unrefined sugar, which contains a small amount of natural molasses — which caramelizes at a slightly lower temperature — provides a flavor that is deliciously reminiscent of butterscotch. The “impurities” in unrefined sugar can cause crysallization so if you use it, care must be taken not to stir the caramel too much.

Pointers for Success
• Most important: When making caramel, be careful to concentrate every moment. Sugar burns are extremely painful.

• Use refined sugar that is absolutely free of impurities, to prevent crystallization.

• To further prevent crystallization, do not allow any sugar crystals to get on the sides of the pan, and be sure to moisten all the sugar with the water. Stop stirring entirely as soon as it comes to a boil. If using a thermometer, be sure to rinse it and dry it if removing and reinserting in the syrup. If any sugar remains on the thermometer, it will cause crystallization.

• Use a pan that conducts heat well (such as unlined copper, aluminum, or anodized aluminum) so that cooking stops soon after it is removed from the heat. Alternatively, have ready a larger pan or sink partly filled with cold water to immerse the bottom of the pan. Do not use a pan with a tin or nonstick lining, as its melting point is below that of caramel.*

• To determine the color of the caramel, use an accurate thermometer or drop a bit of caramel on a white surface such as a porcelain spoon or plate. When making spun sugar, too light a caramel produces a ghostly effect, too dark produces a brassy color when spun.

• To prevent breakage, never put a thermometer used for caramel into water until completely cooled.

• Soaking utensils in hot water will remove hardened caramel.

• After the caramel is prepared, do not stir it too much, as this may eventually cause crystallization.

*There are some special pans, such as the Scanpan, from Denmark, with nonstick properties that can withstand the heat of caramel.

Brownie Puddle from: The Pie and Pastry Bible, Rose Levy Beranbaum

download

1 cup pecan pieces or coarsely chopped pecans (I used 1.5 cups walnuts)
14 tbsps. unsalted butter
3 oz. bittersweet chocolate (I used 3.5 oz. bar of Lindt 70%)
1/2 cup + 2 teas. unsweetened cocoa, preferably fine-quality
Dutch-processed (I used Hershey’s, but it is Dutch-processed)
1 cup + 3 tbsp. sugar
3 large eggs
2 teas. pure vanilla extract
3 oz. cream cheese cut into pieces
1/2 cup all-purpose flour
pinch salt

Ganache Puddle
2/3 of a 3 oz. bar of bittersweet chocolate, coarsely chopped
1/3 cup heavy cream, at room temperature

Equipment:
A 9.5 inch fluted tart pan with a removable bottom, bottom greased, lined with parchment, and then lightly sprayed with nonstick vegetable spray.

Preheat over to 325 degrees at least 15 minutes before bake. Set an oven
rack in the middle of the oven before preheating.

Please the pecans on a cookie sheet and toast them. stirring occasionally,
for about 10 minutes or just until the color deepens slightly. Cool
completely.

In a double boiler over hot water or in microwave-proof bowl, melt the
butter and chocolate, stirring two or three times. If using a double
boiler, transfer the mixture to a bowl.

Beat the cocoa, then the sugar, into the chocolate mixture, beating until
incorporated. (If you are doing this by hand, use a whisk.) Beat in the
eggs and vanilla. When incorporated, beat in the cream cheese until only
small bits remain. Add the flour and salt and mix only until the flour is
fully moistened. Stir in the nuts.

Place the prepared tart pan on a cookie sheet to catch any possible leaks.
Scrape the batter into the pan and spread it evenly. It will fill the pan
almost to the top.

Bake for 30 to 35 minutes or until the batter has set. A toothpick
inserted 1 inch from the side should come out clean. The mixture will puff
and rise a little above the sides but sinks on cooling.

Make the ganache puddle

While the brownie is baking, prepare the puddle. Melt the chocolate in a
double boiler over hot but not simmering water, stirring occasionally, or
in a microwave, using 15 second burst on high power and stirring several
times. Add the cream and stir gently until the mixture is smooth and dark.
If necessary (if the cream was too cold and the mixture is not entirely
smooth), return it to the heat and stir until totally fluid and uniform in
color.

As soon as the brownie is removed from the oven, grease the end of a wooden
spoon (1/2 inch diameter) and insert it into the brownie at 1 inch
intervals, all the way to the bottom, twisting slightly as your insert and
withdraw it to create 23 to 28 little holes. Using a small spoon or a
re-closable freezer bag with a small piece cut off one corner, fill the
holes with the ganache until slightly rounded on top (you will need at
least 1/2 teaspoon for each). Place the pan on a wire rack and cool
completely. The chocolate puddles will sink in as the brownie cools and
more ganache can be added to fill in any depressions as long as the brownie
is still warm enough to melt it. (If necessary, you can set the tart under
a lamp to heat the ganache puddles and make them smooth.)

Unmold the tart, and place it onto a serving plate. To serve, use a thin
sharp knife to cut into wedges. Oven temperature: 325 F
Baking time: 30 to 35 minutes
Serves: 8

Store:  Wrapped tightly in plastic wrap and stored in an airtight container room temperature, up to 1 week; refrigerated, up to 1 month; frozen, several
months. Try it frozen or chilled if you like a chewy brownies, at room temperature for a softer creamier texture.

CARAMEL VARIATION: Caramel blends perfectly with the chocolate and pecans and is wonderful both at room temperature and refrigerated, when it becomes more sticky and chewy. Make a half recipe of the Caramel Sauce and use it in place of the chocolate puddle glaze. It is easiest to pipe it into the holes. The caramel will pipe when warm or at room temperature.

Homemade Chunky Bars- Peanut Rasin Bars

chunky-recipe
2 cups milk chocolate chips
⅓ – ½ cup raisins
⅓ – ½ peanuts, coarsely chopped

In a double boiler, slowly melt your chocolate chips. If you use block chocolate, make sure your chocolate is chopped into even sized pieces.

Evenly distribute peanuts and raisins inside chocolate molds.

Once chocolate is melted, carefully pour it inside chocolate molds -making sure you don’t overfill too much but filling it all the way to the rim.

Transfer chocolate molds inside refrigerator and let them harden – 4hours or overnight.

Grandma Carlough’s Midnight Cake (or cupcakes, or bundt cake, or…) from Liz McGowen

10451058_10204378372762868_5513862839625449398_n
1 1/4 cups sugar
2 eggs
1/2 cup cocoa
1/2 cup oil
1/2 tsp. salt
1 1/2 c flour
1 tsp baking soda
1 tsp baking powder
1 cup hot water
1 tsp vanilla

Preheat oven to 350.  Mix first 4 ingredients; mix in rest of dry ingredients; add vanilla to hot water and mix into other ingredients.  Bake in 8″ round cake pans or pour into cupcakes, or bundt pan.  Check with toothpick after 25 minutes.  Delicious, rich, moist, versatile batter – passed down through generations!  I use a mixmaster.  Makes the perfect birthday cake!

Cherry Crisp from browneyedbaker.com

cherry-crisp-4-550

For the Crisp Topping:
6 tablespoons all-purpose flour
¼ cup light brown sugar
¼ cup granulated sugar
¼ teaspoon ground cinnamon
¼ teaspoon salt
5 tablespoons cold unsalted butter, cut into ½-inch pieces
¾ cup pecans, finely chopped

For the Cherries:
6 cups fresh cherries, pitted
2 tablespoons granulated sugar
1 tablespoon cornstarch
1 tablespoon Amaretto

1. Preheat oven to 375 degrees F and adjust oven rack to lower-middle position.

2. To prepare the topping, whisk together the flour, sugars, cinnamon and salt. Add the butter pieces and toss to coat with flour. Using your fingers, pinch the butter pieces together with the flour mixture until the mixture looks crumbly and like wet sand. Add the pecans and toss to distribute evenly. Refrigerate the topping mixture for at least 15 minutes.

3. While the topping mixture chills, get the cherries ready. In a small baking dish (about 1.5-qt or 8×8-inch), toss the cherries with the sugar, cornstarch and Amaretto. Sprinkle the topping mixture evenly over the cherries.

4. Bake for 40 minutes, then increase the oven temperature to 400 degrees F and continue to bake until the fruit is bubbling and the topping is deep golden brown, about 5 minutes longer. Serve warm or at room temperature.

Note: You can omit the Amaretto if you’d like and just add 1 teaspoon vanilla extract instead.